This is a small introduction to stateful applications, I made it based on my personal notes. We will also dive into how they’re implemented in Kubernetes.
Table of Contents
Open Table of Contents
What is a Stateful Application?
A stateful application saves client data in one session for use in the next session. Stateful applications remember the state of interaction between the client and the server. Other than in stateless applications which treat every request as an independent transaction unrelated to any previous request. Examples of stateful applications are Databases, Data-Stores, and even something like E-commerce Websites or Online Games. In all of those, you need to remember some information from previous states or sessions.
Stateful Applications in the World of Containers
Now the question is, how do we get that stateful application onto the context of containers and into Kubernetes?
Back when containers were created, they were only used for stateless applications. This was the perfect fit for containers, since containers can be started, stopped, and replicated easily without worrying about maintaining any internal state.
Until today the container ecosystem evolved and gotten better at handling stateful applications. Technologies like the Docker Volumes or Kubernetes Statefulset were introduced. Those are making it possible for us to run databases, content management systems, and other stateful applications in containers.
Stateful Applications in Kubernetes
Now that we have a basic understanding of what stateful applications are, let’s take a look at how they’re implemented in Kubernetes.
In Kubernetes, we have StatefulSets for managing Stateful Applications. Let’s explore them in a practical example.
apiVersion: v1
kind: Service
metadata:
  name: nginx
  labels:
    app: nginx
spec:
  ports:
    - port: 80
      name: web
  clusterIP: None
  selector:
    app: nginx
---
apiVersion: apps/v1
kind: StatefulSet
metadata:
  name: web
spec:
  serviceName: "nginx"
  replicas: 2
  selector:
    matchLabels:
      app: nginx
  template:
    metadata:
      labels:
        app: nginx
    spec:
      containers:
        - name: nginx
          image: registry.k8s.io/nginx-slim:0.8
          ports:
            - containerPort: 80
              name: web
          volumeMounts:
            - name: www
              mountPath: /usr/share/nginx/html
  volumeClaimTemplates:
    - metadata:
        name: www
      spec:
        accessModes: ["ReadWriteOnce"]
        resources:
          requests:
            storage: 1Gi
This example contains two parts, a headless service, and a statefulset. Let’s look at what a headless service is.
apiVersion: v1
kind: Service
metadata:
  name: nginx
  labels:
    app: nginx
spec:
  ports:
    - port: 80
      name: web
  clusterIP: None
  selector:
    app: nginx
A headless service is a service with ClusterIP set to None, which means it has no Cluster IP assigned to it. Every DNS query to it gets answered with a set of IPs from the pods selected by the service. It provides stable network identities, which are crucial for stateful applications. So remember, to communicate with the service we use only DNS and not the IP address.
Let’s look at the Statefulset:
apiVersion: apps/v1
kind: StatefulSet
metadata:
  name: web
spec:
  serviceName: "nginx"
  replicas: 2
  selector:
    matchLabels:
      app: nginx
  template:
    metadata:
      labels:
        app: nginx
    spec:
      containers:
        - name: nginx
          image: registry.k8s.io/nginx-slim:0.8
          ports:
            - containerPort: 80
              name: web
          volumeMounts:
            - name: www
              mountPath: /usr/share/nginx/html
  volumeClaimTemplates:
    - metadata:
        name: www
      spec:
        accessModes: ["ReadWriteOnce"]
        resources:
          requests:
            storage: 1Gi
In the yaml file of a Statefulset, we need to specify the headless service we created before, and similar to a deployment, we specify replicas and a template for the pods. Other than that, we provide a volumeClaimTemplate for PersistentVolumeClaims. The claims and its PersistentVolumes will be created automatically by the Statefulset.
Let’s apply the yaml file and take a closer look at what the Statefulset creates.
kubectl apply -f stateful-application.yamlLet’s look at the pods created.
kubectl get pods
We see that each pod has a unique identifier, the number behind the pod, which is maintained across rescheduling and restarting. This allows each pod to be accessed via a stable hostname. We can test it for the web-0 pod like this:
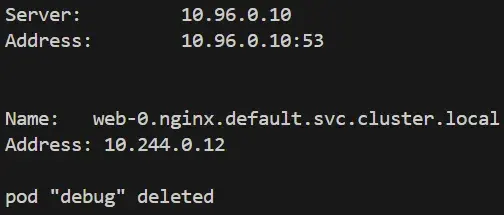
kubectl run -i --rm debug --image=busybox --restart=Never -- nslookup web-0.nginx.default.svc.cluster.local
A debug pod is used to test the DNS connection and is deleted afterwards. We are using the FQDN (Fully Qualified Domain Name) here, which is web-0.nginx.default.svc.cluster.local. (Format: <pod-name>.<headless-svc-name>.<namespace>.svc.cluster.local)
The nslookup command gives us the IP from the web-0 pod, which means the command worked and we can connect to the pod via DNS.
Another fact is that the pods will be scheduled in the order of the number assigned to them. For example, web-0 is scheduled and created first, and then web-1, and so on.
Thank you for reading this post on stateful applications in Kubernetes! I will update this post with more information soon, stay tuned.